|
After all the windows have been installed and the Sikaflex has dried we were able to start installing all the seats and start completing all the small details. The seats come from Willingham Canada with custom upholstery with the Keefer Lake Lodge logo stitched into the headrests. The seats are comfortable and light weight with enough shoulder room to comfortably fit all 15 passengers. 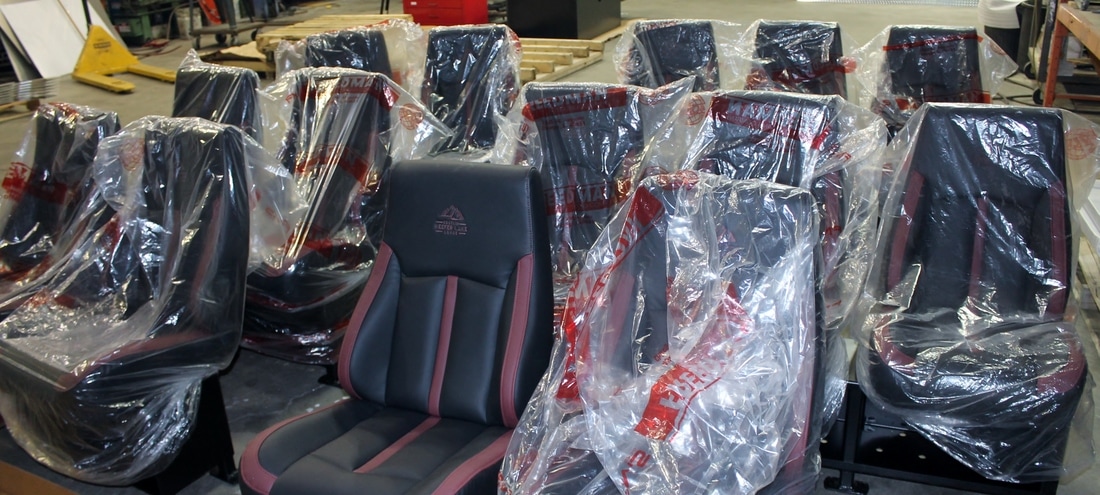 Oak Creek all terrain vehicles supplied The brand new Pisten Bully 400 snow cat for the build and dropped it off to us at Aqualu Industries to test fit the passenger carrier. 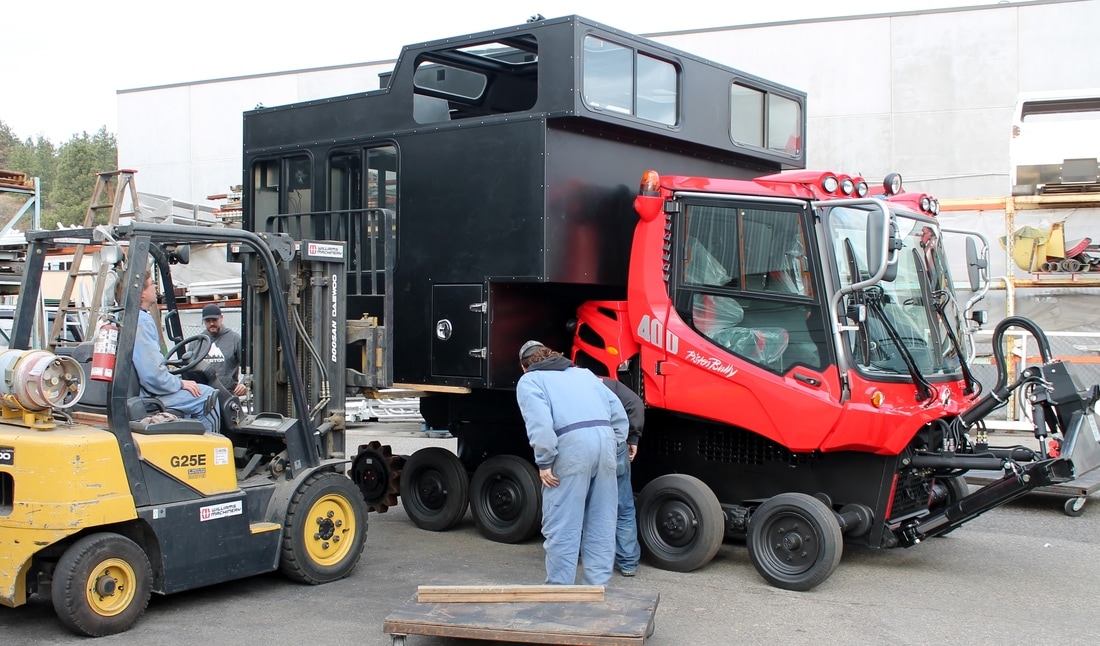 We then bolted on all the rear accessories like the folding stair case and the ski / snowboard boxes. After everything was where it needed to be, it was time to take it back off to continue with our long list of final details. Like getting the decals put on. 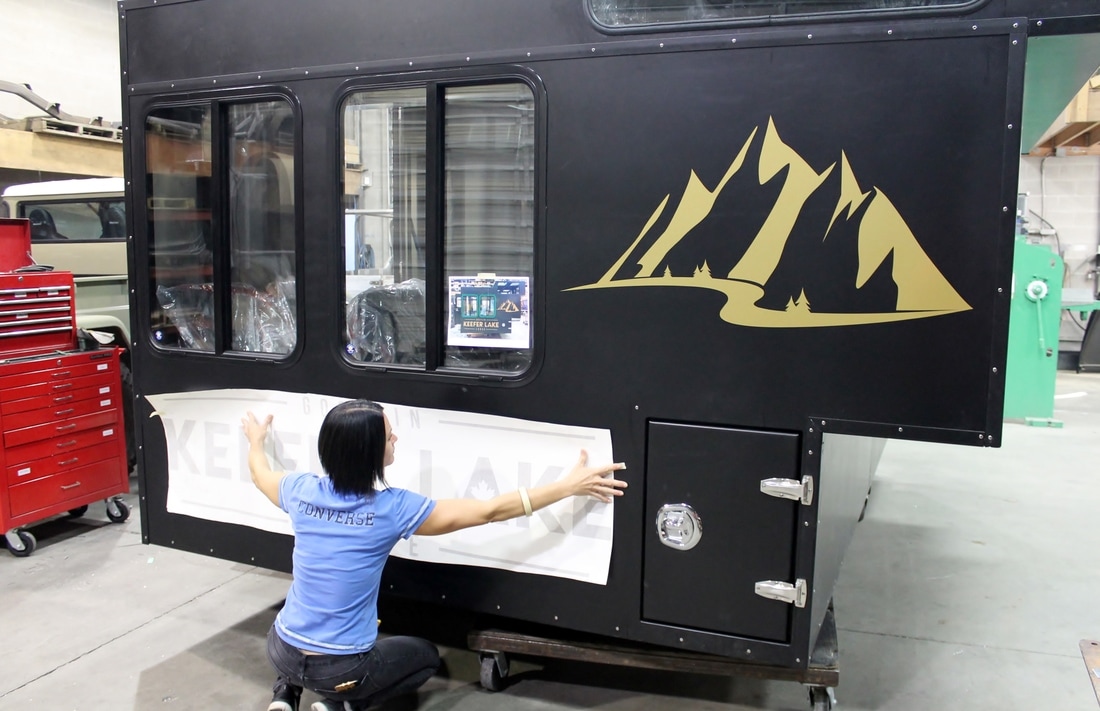 Sign Craft sent one of their employees here to lay out the gold decals as one of the final touches before we put the passenger carrier back on the snow cat for a final time. Before we ship it out to Keefer Lake Lodge. 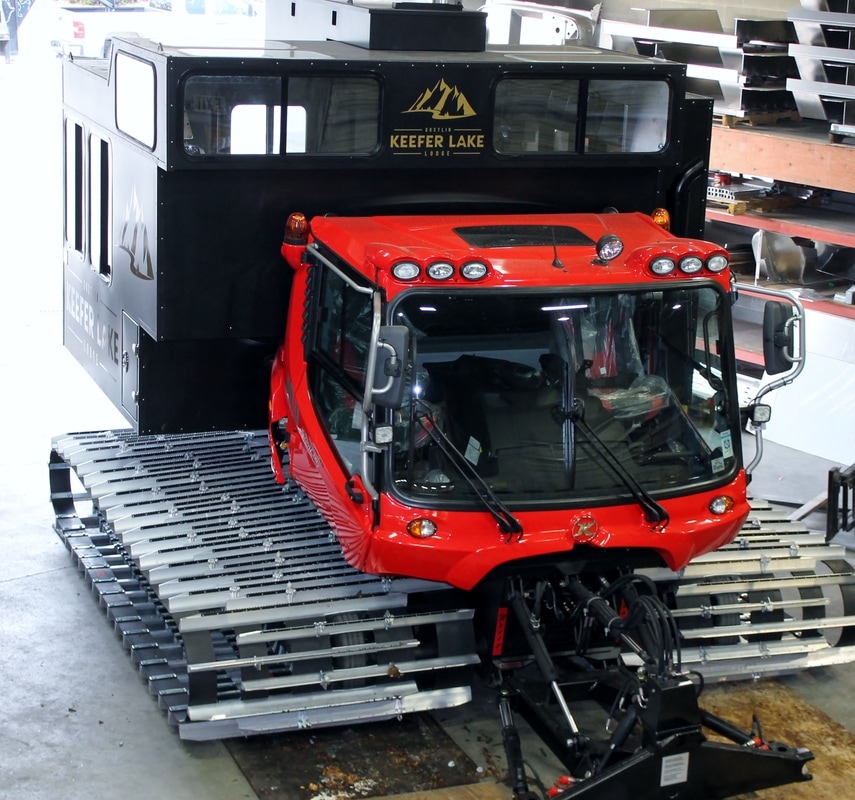 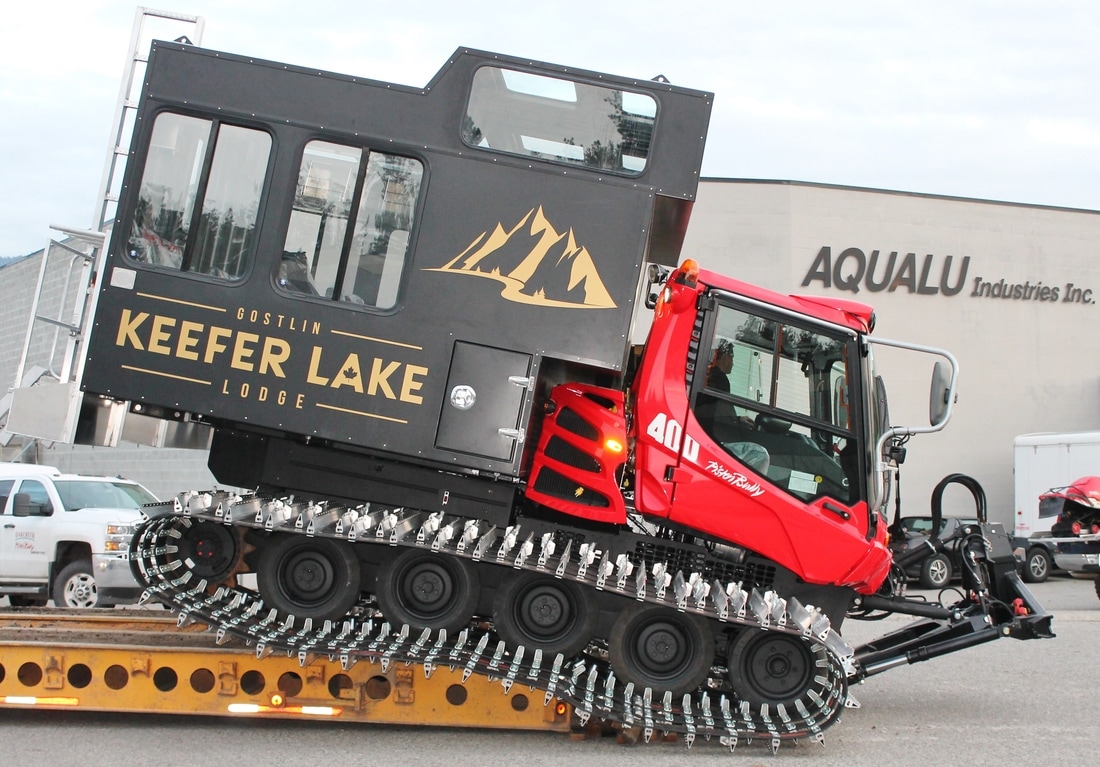 Big thanks to all the local companies who helped make this a reality and huge thank you to Jeff Gostlin of Keefer Lake Lodge for the opportunity to give you Aqualu quality in a unique project such as this.
2 Comments
With the Sikaflex on the exterior all dry, we can now focus our attention to the interior. The interior panels are a combination of .063” thick on the walls, and 3/16” thick checker plate on the floors. Again we turned to our CNC router machines to cut out the panels to include seat mounts, fuel filler and of course rivet holes. We chose to leave the frame exposed on the roof for a unique look while insulating most of the walls and covering them with our .063” thick panels. The raised section inside keeps all passengers facing forward which is a luxury when you’re climbing a mountain 80% of the time, no side seats or rear facing seats which make it uncomfortable on those long climbs, just another feature that makes this passenger carrier a step above. 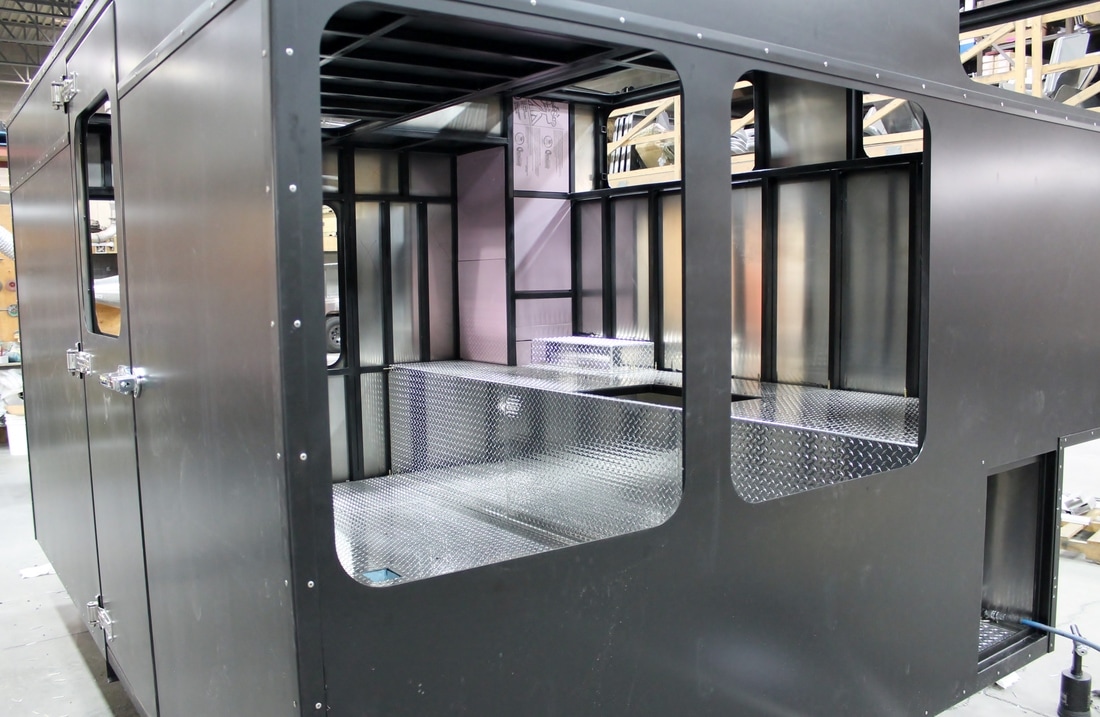 Another key feature of this passenger carrier is the overhead storage boxes, Each passenger has their own storage box which is large enough to carry your safety packs and your glove, goggles and other winter gear, they even includes 2 glove heaters per box. In the back corners of the passenger carrier are two heaters that bring heat to the glove heaters as well as defrost the big sliding side windows. 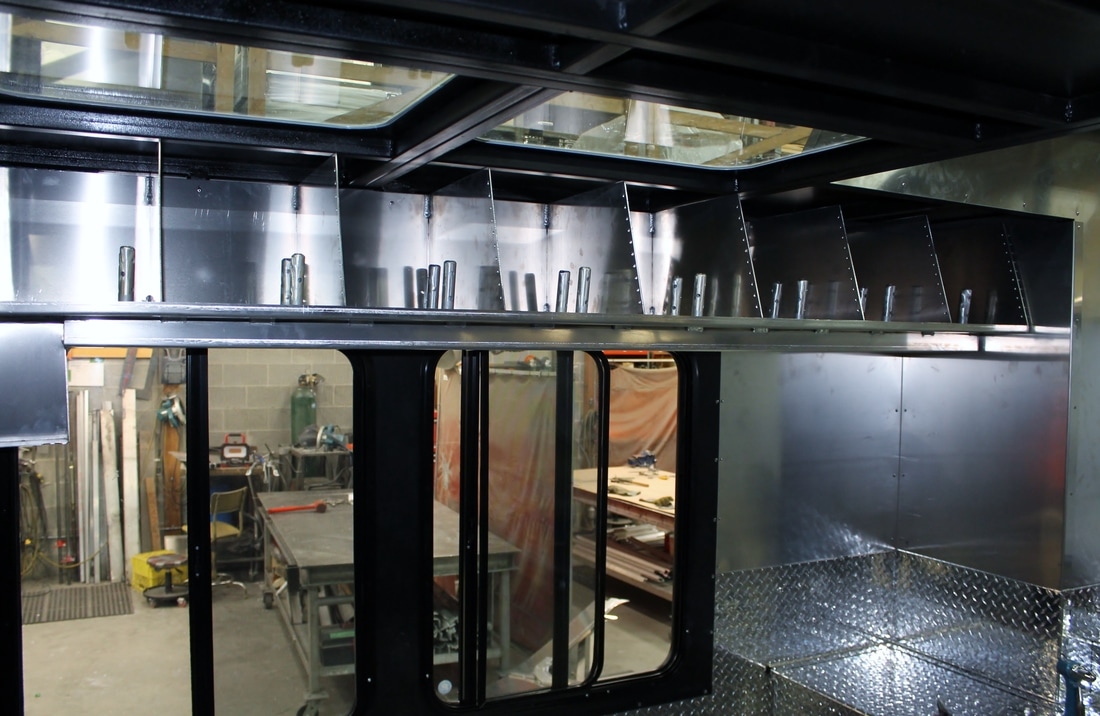 Speaking of windows, this Passenger carrier has 18 of them, 10 Fixed windows on the roof and 8 windows on the sides (7 of which are sliders) to allow for maximum airflow. The upper deck has almost a 360 degree view. More Sikaflex was used when installing the windows to keep them water tight. 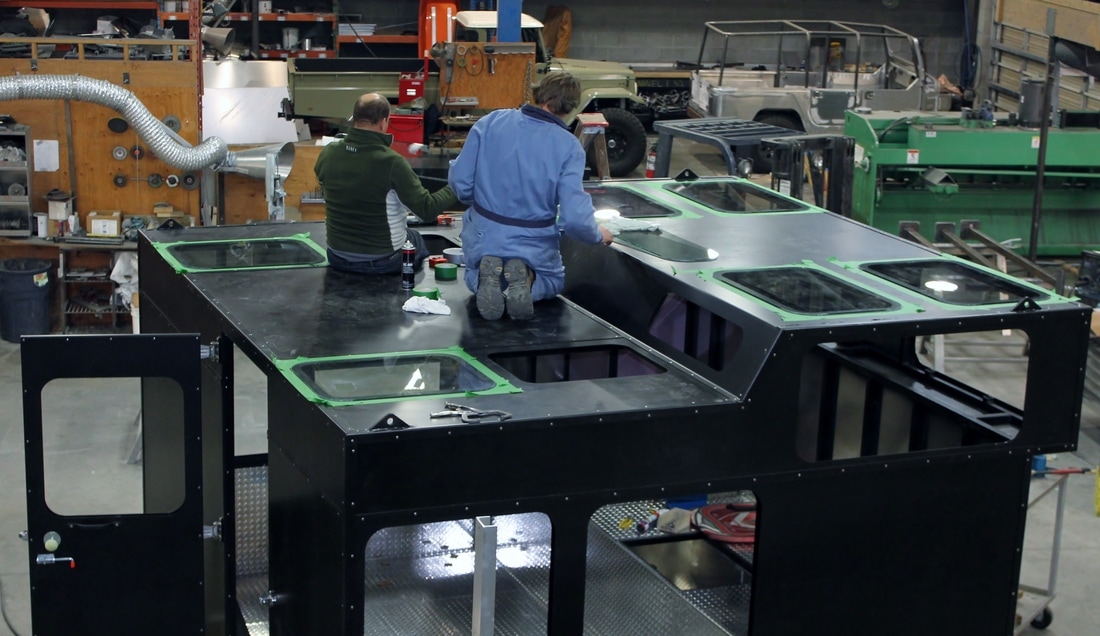 We have had an interesting request from Jeff Gostlin, owner of Keefer Lake Lodge, to construct a top of the line passenger carrier to go on the back of a snow cat. We have never constructed one of this size and caliber before. The original plan is to seat 14 people with one guide, have enough storage for everyone’s gear, provisions for as many windows as possible, sound system and even a TV. Needless to say this thing will be one of the most luxurious snow cat passenger carriers in western Canada. 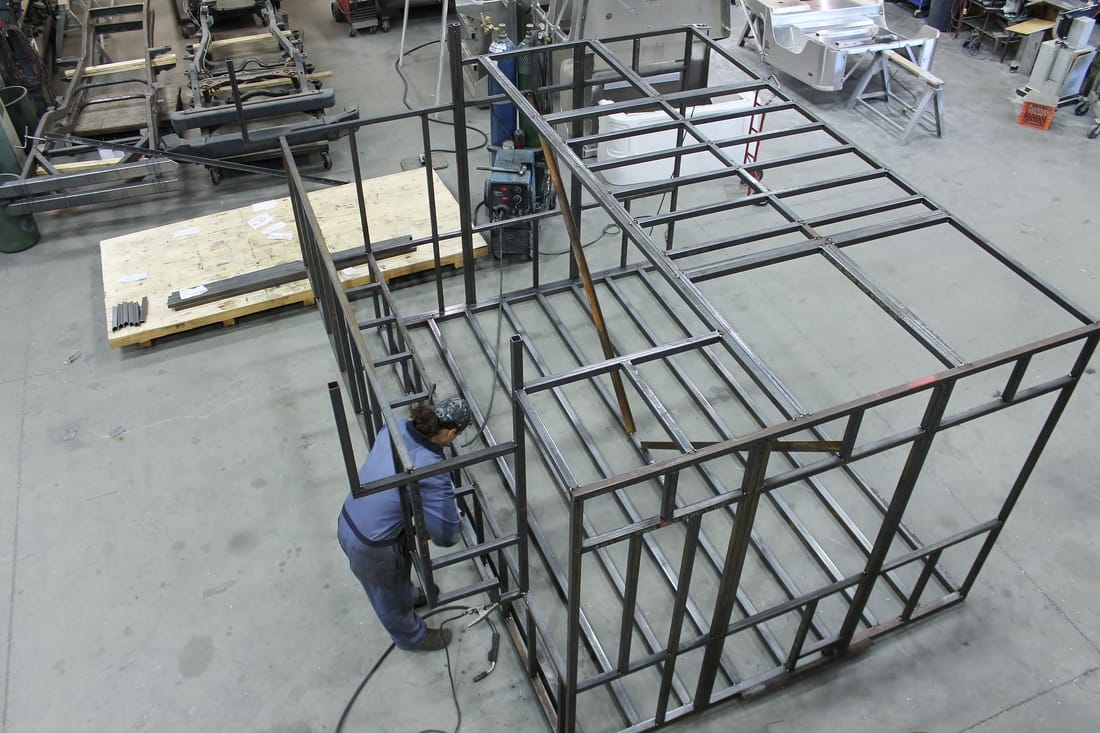 We started with a steel frame that is almost 13 feet wide, over 7 feet tall and close to 11 feet deep. Our plan is to then wrap this giant in 1/8” aluminum sheets on the outside and .063” thick sheets on the inside. Having a couple CNC Router machines in house, it made it easy to account for things like window cut outs, drainage and all our rivet holes. Pre-fitting all the components prior to powder coating is key for any build to allow for any design errors to be worked out long before final assembly. We spent a few days making sure all our panels fit perfectly before sending them to powder coat. 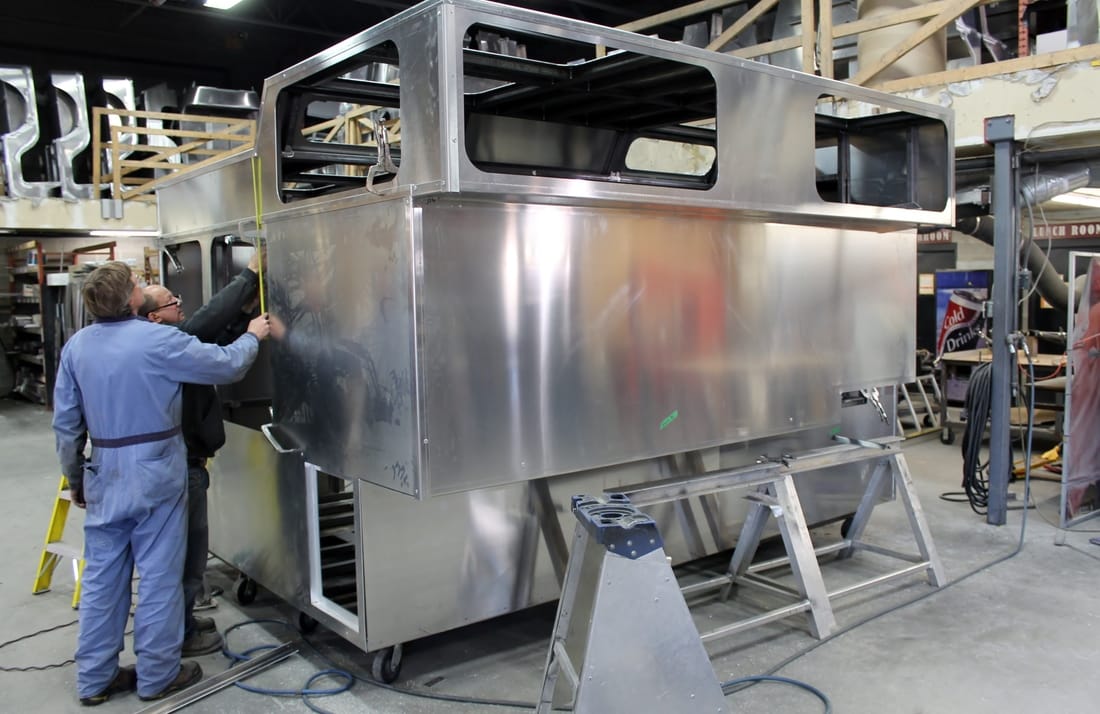 While we had all our exterior panels next door at Protek Powdercoaters. We painted our steel frame black with a two part rust inhibiting paint. Once the paint dried and we got our panels back from powder coat, the first step of the assembly was to insulate the floor then Sikaflex and rivet the bottom panels on before tilting it right side up again to tackle the rest of the exterior panels. All panels are installed the same way; using Sikaflex anywhere the panels will touch the frame, clamp and rivet. The Sikaflex is a marine grade adhesive that also acts as a sound deadening material to eliminate any rattle between frame and aluminum panels. 24 tubes of it were used in the construction of this snow cat passenger carrier. Before we considered the exterior complete, we covered all corners and seams with our own 1/8” thick corner caps and seam covers. 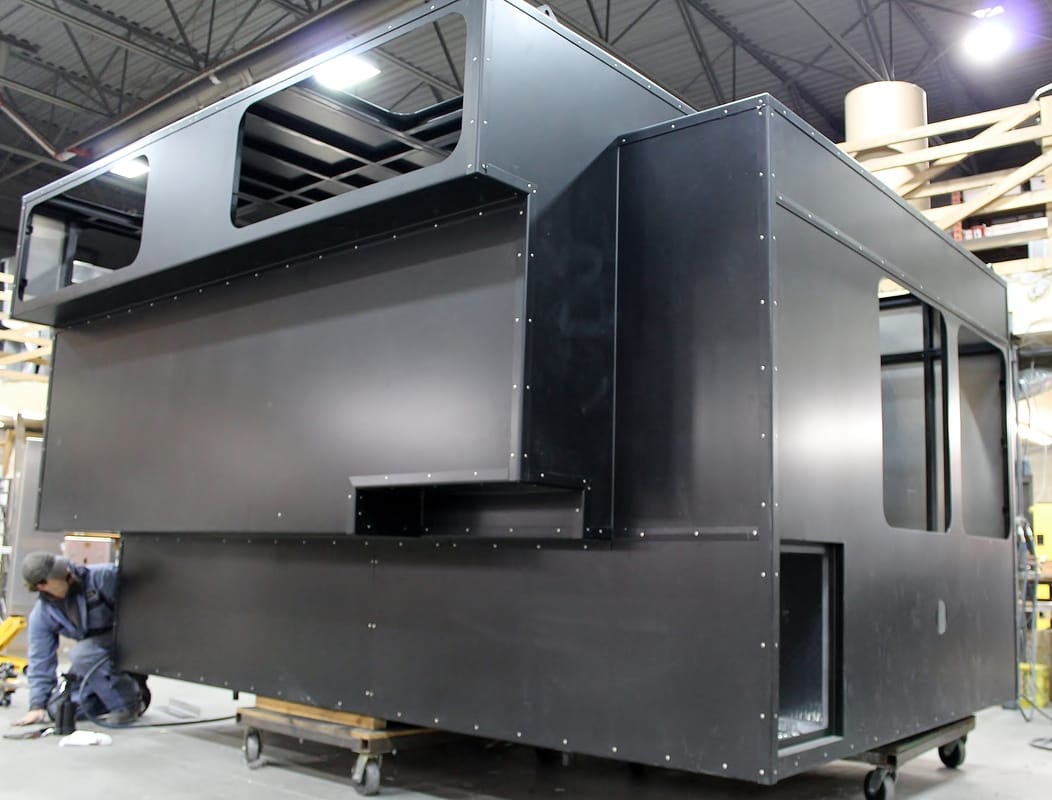 It has taken a little longer than expected but we are finally at a point with our Shop Truck build that we feel comfortable saying ‘It’s Done’ It has taken a lot of research and design to get it to this point. A big thanks to everyone involved, the completion of this build would not be have been possible without our CAD team here at Aqualu, all staff members helping with the design input, friends and family coming by to help on those late nights at the shop and of course Todd, the owner of Aqualu Industries and owner of ‘The Shop Truck’. A big thank you to everyone who has helped in anyway, even if all you did was brought a case of beer on thirsty Thursdays! 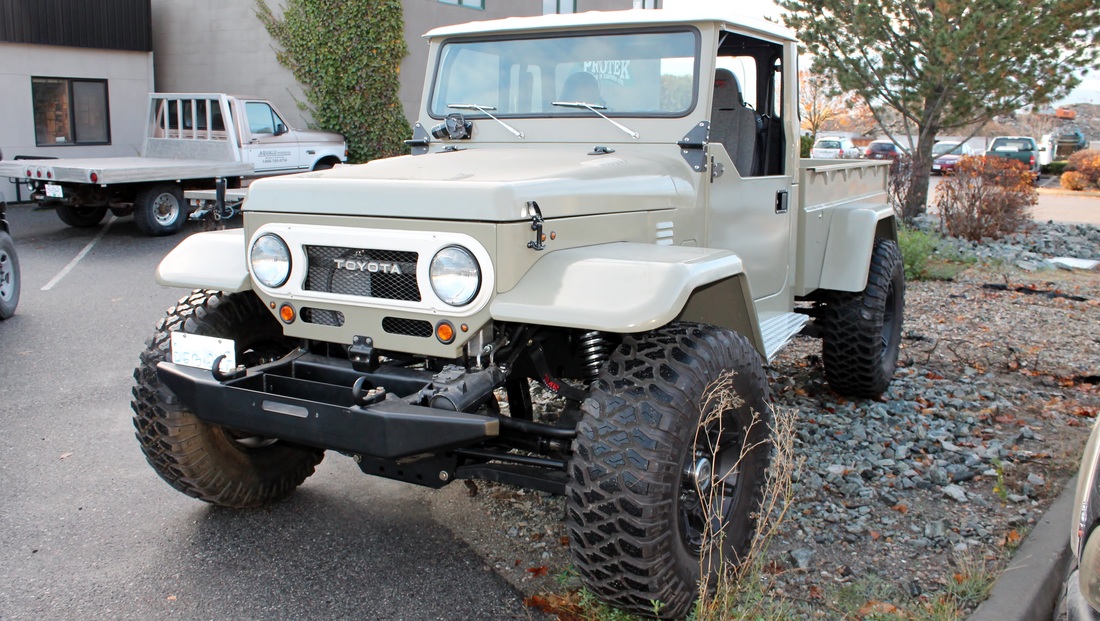 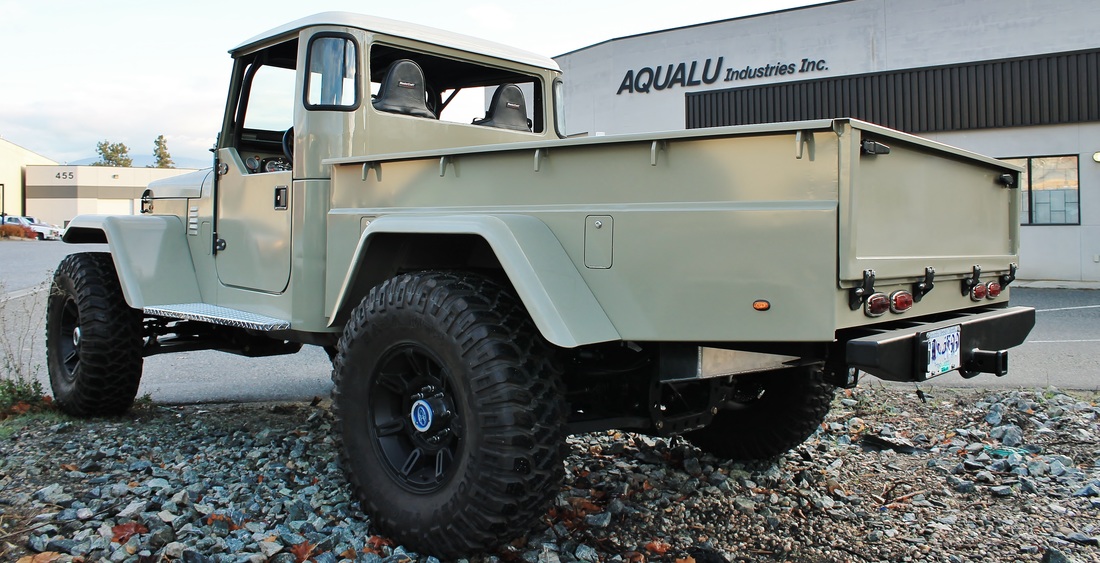 On our first trip out with this truck we were impressed at the how well the military gamma goat differentials performed on the street. With the 5:57 gears we were able to hit highway speeds and yet they aren’t geared too low for driving in stop and go traffic. During acceleration the tranny shifts seamlessly throughout the gears and the big 13” WillWood brakes slow this beast to a stop way better than we imagined they would. The exhaust is loud but not overbearing, the custom built headers worked out amazing. We played with the rear steer a little bit too and one of our concerns was not being able to center the steering after use and start wandering on the highway, however with the self centering pin we designed, it works smooth and flawlessly. This will really help us navigate through the local mountains, or if we need to cheat a little bit going through the Starbucks drive thru. We have a few things to tighten up in order to call this grocery getter 100% complete like a rear window, side and rear view mirrors. But while we are finishing up all those minor things on our ‘Shop Truck’ we can also begin planning out our next build. Here is a ‘Torq Super 14’ Aluminum housing 14 bolt differential with an ARB air locker and a Currie enterprise ford 9” with 4:10 gears. I think these are a great place to start a build. What would you put these in?  *Disclaimer, Aqualu only builds vehicles for in house abuse, we do not offer build services.*
For this week we have been slowly going through the ‘Shop Truck’ project checking wiring, checking hoses, filling fluids and just an all around inspection of everything before we close it all up with our newly powder coated body panels. We thought about it for a while and decided this truck is going to need more power if we want it to perform to the best of its abilities in the bushes and on the street. For a little added power of course we have our custom headers that we talked about in a blog a couple weeks ago, well to those we added some Flowmaster mufflers with true duel exhaust. 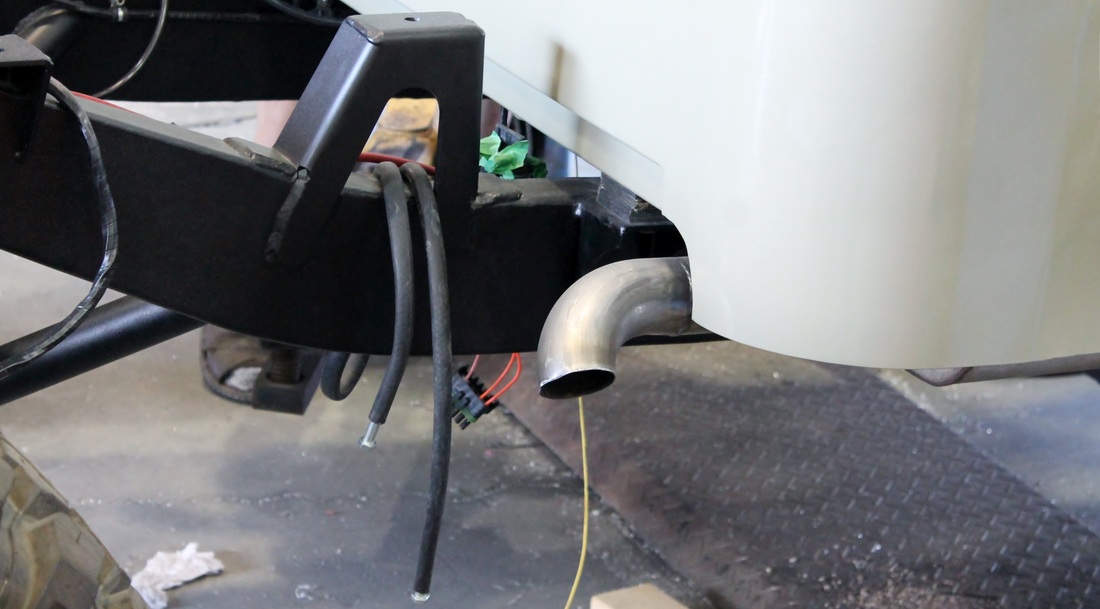 Paired with the exhaust is an Edelbrock cone filter and custom intake tube. This will help increase the ponies by letting the engine breathe a little easier. We also added a lift cam to help wake the engine up even further. Unfortunately we learnt the hard way that when you fabricate your own custom headers, make sure you have clearance for some spark plug wires. Luckily we found some MSD ones that can squeeze in there otherwise we would have been back to the drawing board for new headers. 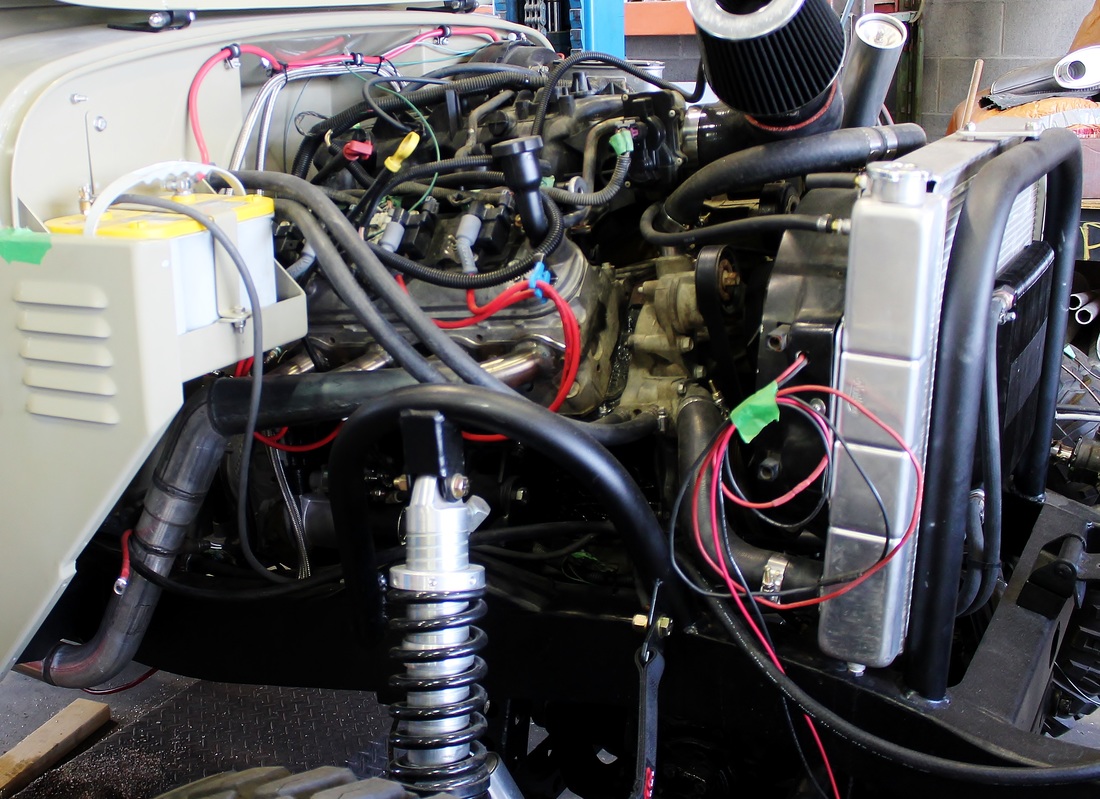 The past few days have been filled with buttoning up all the little things like wiring up all the gauges, connecting brake lines and installing the glass in the hard top. This stage of any build is where the attention to detail and organization really pays off. Next week, we should finally get to hear this thing fire up! 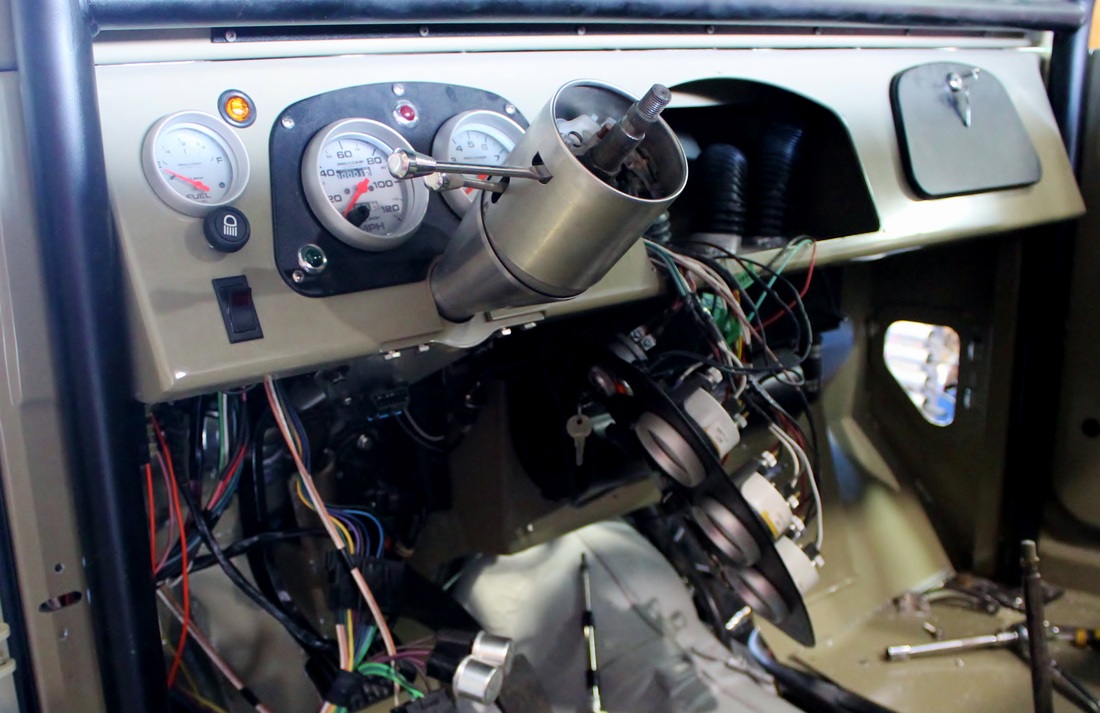 *Disclaimer, Aqualu only builds vehicles for in house abuse, we do not offer build services.*
You know you’re nearing the end of a build when all your body components finally have the final finish on them whether it is powder coat or paint. In our case it’s both. Throughout this build we have been periodically sending our completed parts next door to Jason Fritz at Protek Powder Coaters to get some color laid down. Well, this week we got our final parts back from Jason and can now see the light at the end of the tunnel. We started with installing the turn signal and marker lights on our front fenders as well as a washer fluid tank and the coolant reservoir tank. 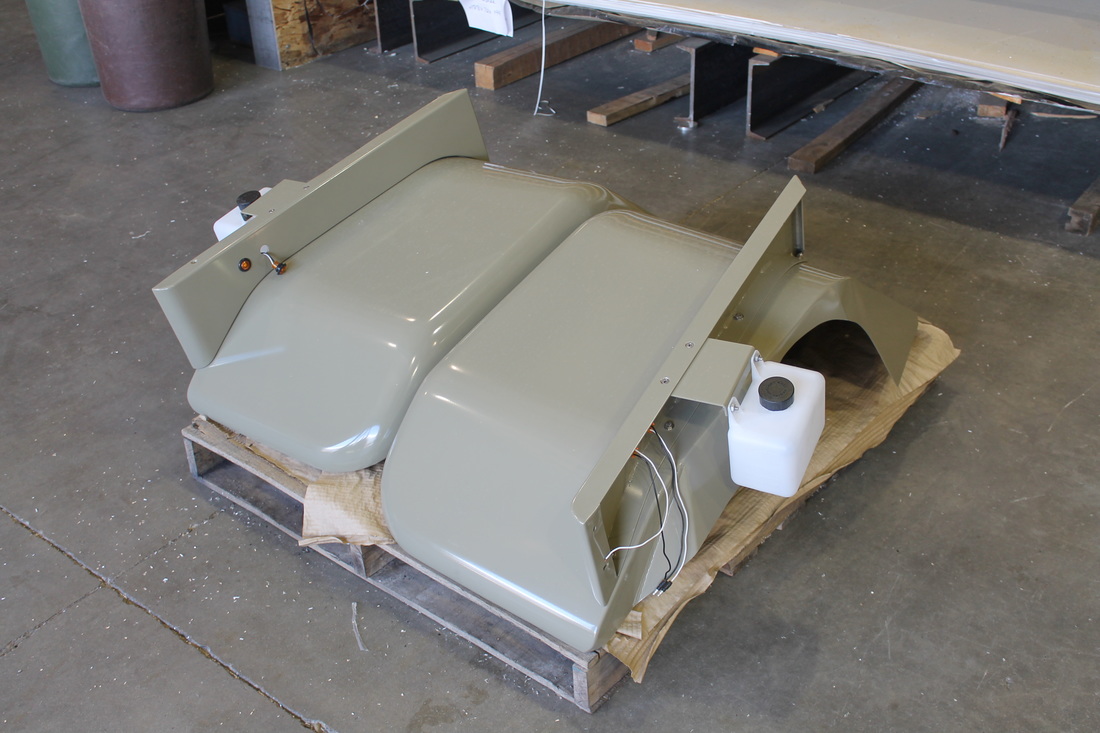 Mounting the front fenders back on the truck was super easy and this is when we can start mounting the rest of our engine bay goodies like our front grill and bezel. We get to install the additional marker lights and headlights and of course the hood. Another product we manufacture here in house is our fiberglass hard tops for the FJ45 Cab. We got ours back from paint and the color match is perfect! Before we mounted the hardtop to the Cab we sprayed in some bed liner to finish it off on the inside. 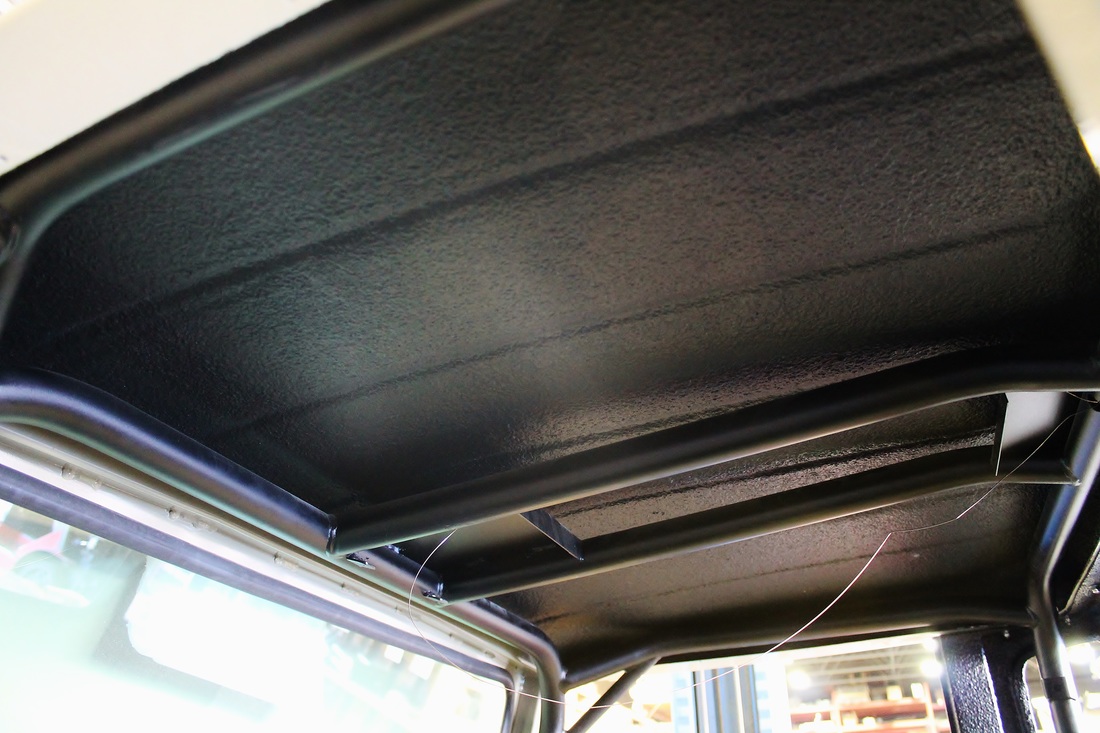 We also sprayed the inside of the box with the same bed liner. Next week we will be reattaching everything back to the truck. Hook up some full lines, fill all the fluids and hopefully hear this thing running! 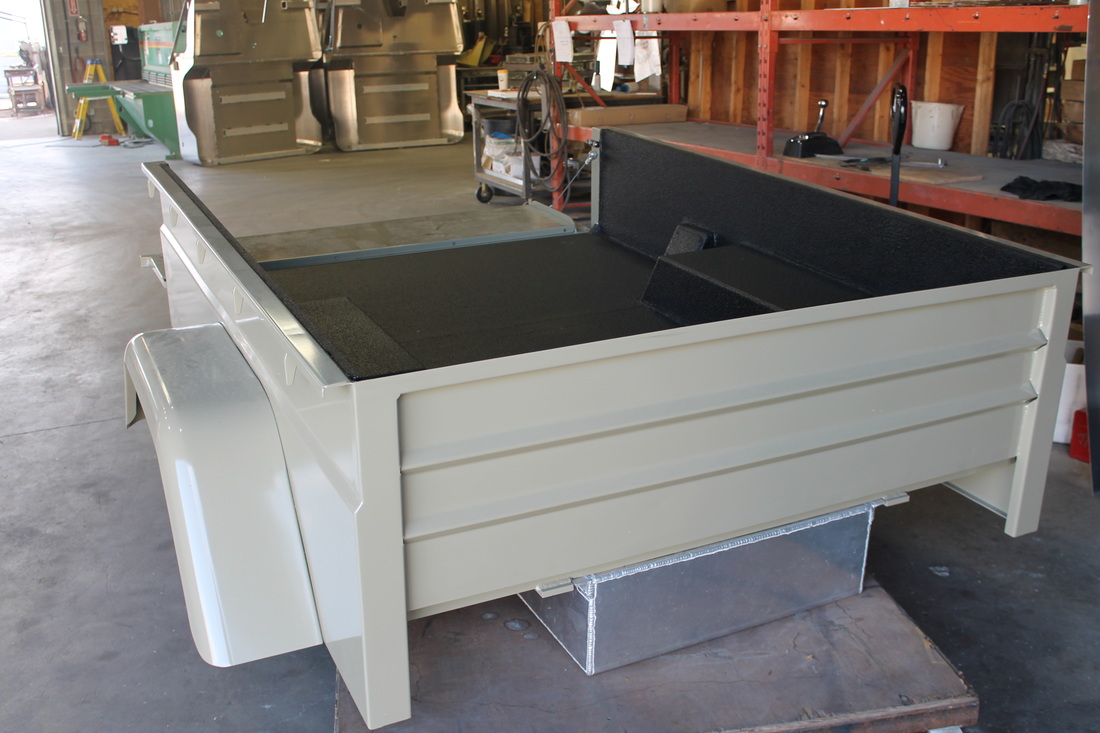 *Disclaimer, Aqualu only builds vehicles for in house abuse, we do not offer build services.*
After fitting the box to our powder coated frame last week. We have since prepped it by blocking out the aluminum and grinding down any visible welds then sent it next door to have powder coated to match the cab. This week we have been busy building as much of our cab off the frame as we can before laying it on the frame for a final time. We are installing things like our gauges, brake booster and steering column. Getting the roll bar to fit back in without scratching any of the powder coat was a challenge but with a few heavy duty ratchet straps we managed to squeeze it back into place. The cab went together pretty smoothly and now we can get it on our frame. 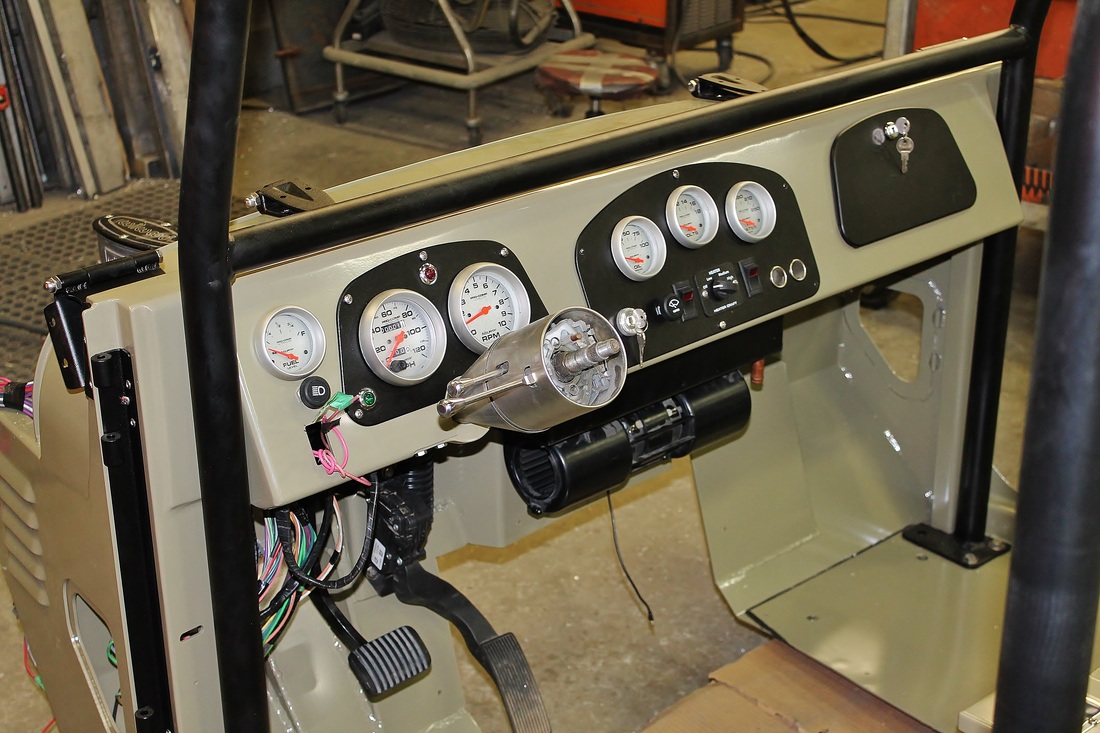 Now that our cab is on the frame we can fit our other front end components for final fit up before we send them to get some color as well. We had to widen our #4023 extra wide front fenders an additional 4” to get the tire coverage to match the rear. 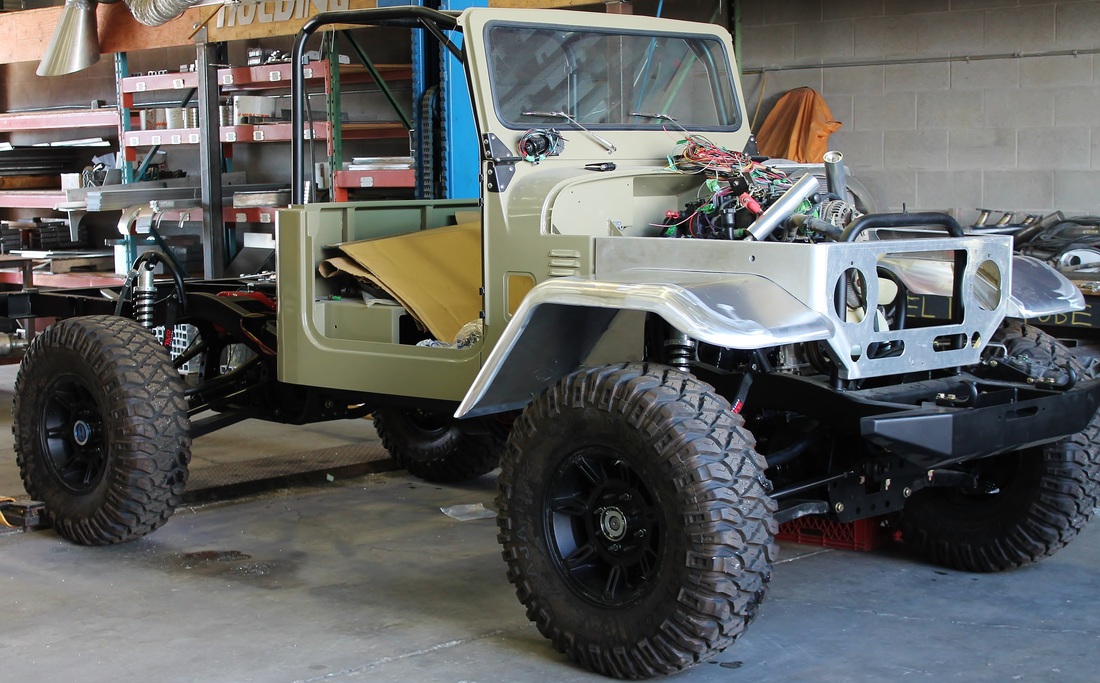 The idea now is to adjust everything up front in order to get even gaps all around making sure the pieces are centered and level. Taking your time with this step will ensure we get a super nice finished product. After a few hours of adjusting all the front end components we were happy with the results, and it could all be taken apart again to be prepped for powder coating. We are getting close to finalizing this build and I for one am getting antsy to hear it come to life. 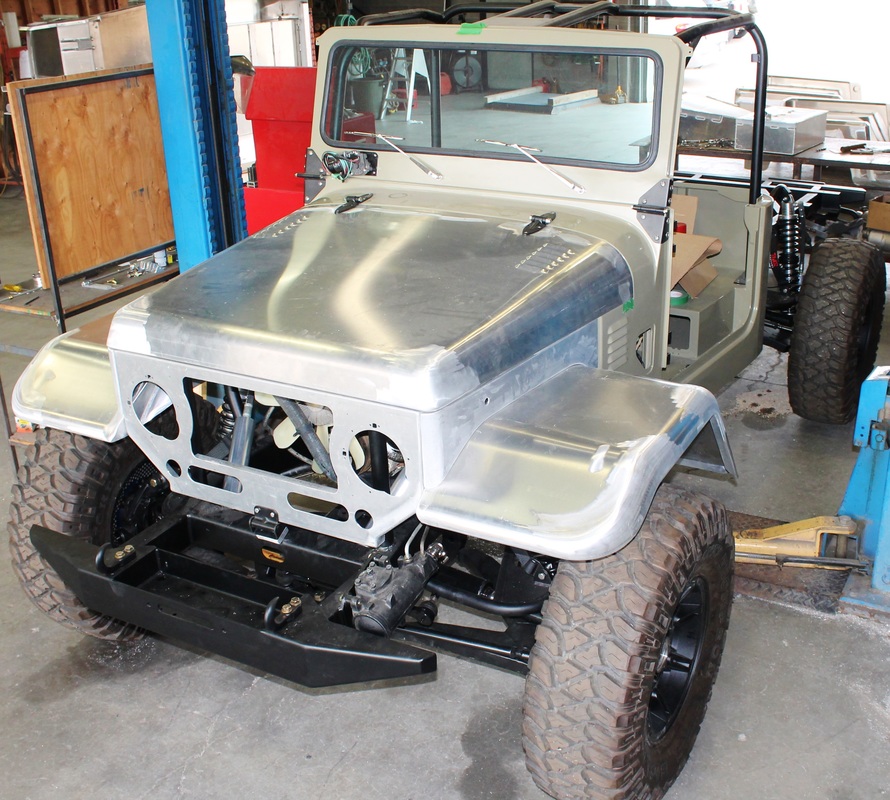 *Disclaimer, Aqualu only builds vehicles for in house abuse, we do not offer build services.*
The last time we fit our box on the frame we noticed the wheels were way too wide and we had zero coverage which is something we needed to address. What we have done is taken the design of our #4038 rear fender flares – large and widened them another 4 inches and changed our wheel choice to something with a lot less of an offset. Changing the wheels netted us approximately 7 inches of total width overall and with the addition of the wider fender flares we now have almost 100% tire coverage. 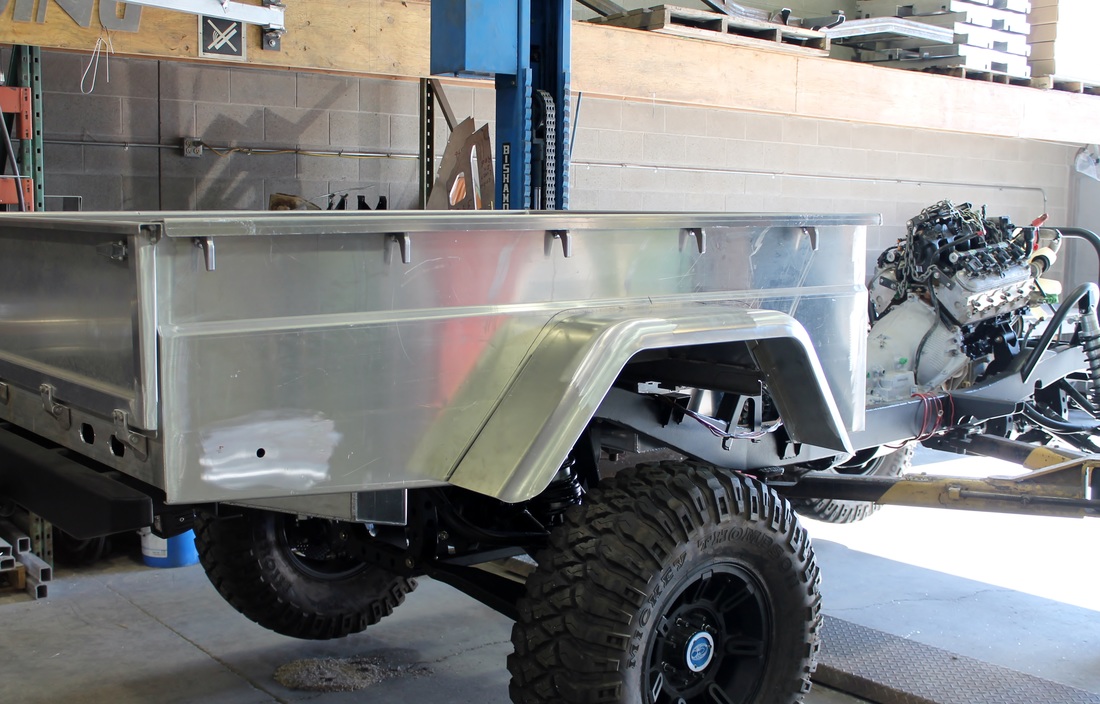 If we were building another snow thrower, we wouldn’t have worried so much about the coverage but we also need this thing to be streetable. After we mounted the box to the frame, installed the tailgate and our custom fender flares we needed to make sure we could flex it out without the tires interfering with our box. If any modifications were to be made, now is the time because in a couple weeks it is getting powder coated. 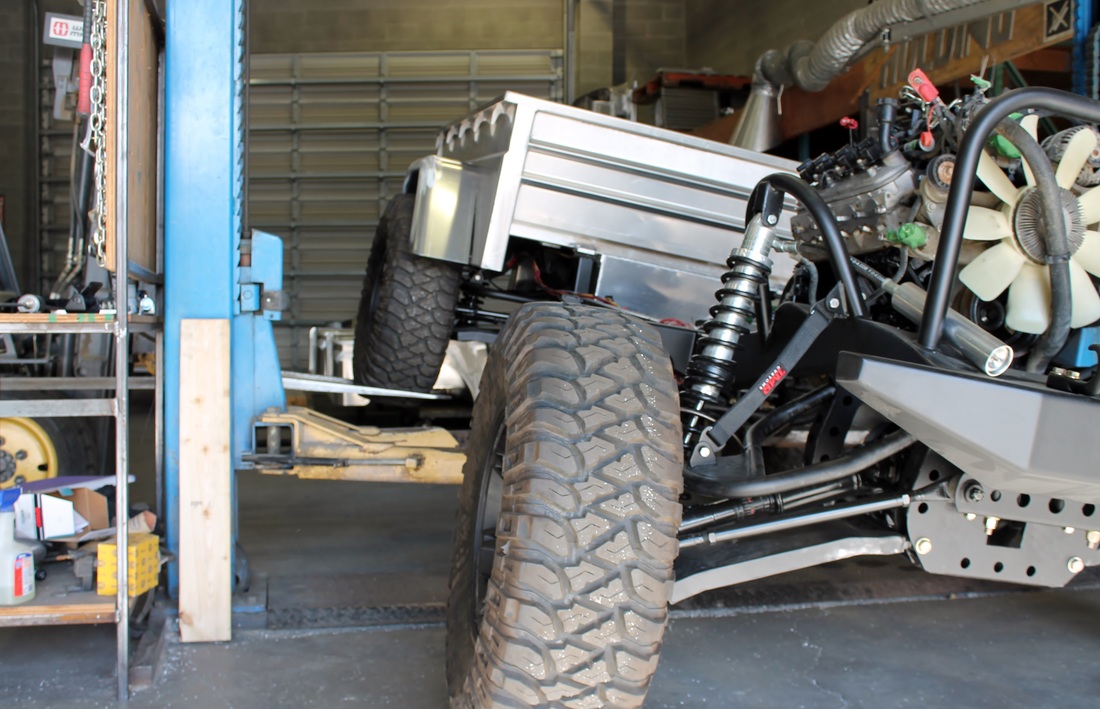 The F-O-A coilover’s definitely kept the tires far away from the box and the fender flares. I don’t think we will have any issues tackling any terrain from the local trails to the street in any weather. As you can see we have also made pretty good progress on mounting our drive train. The 6.0ltre LQ4 and 4L80e transmission are in their final resting places. Next week we will be throwing some color on the cab and piecing it together so stay tuned. 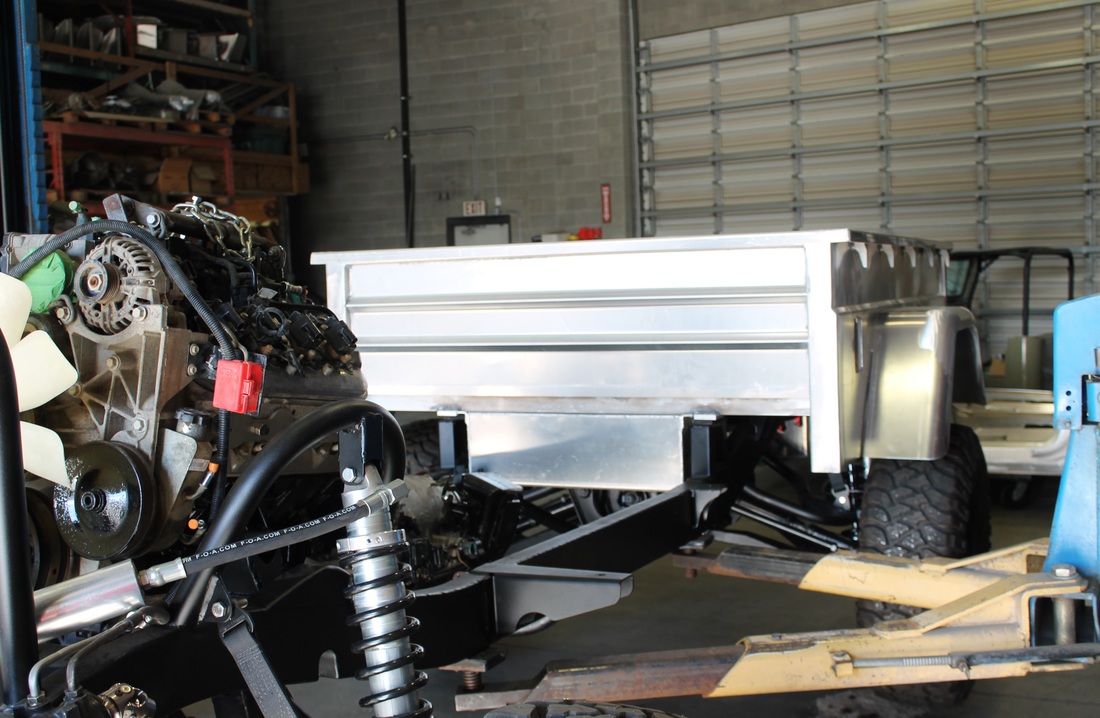 *Disclaimer, Aqualu only builds vehicles for in house abuse, we do not offer build services.*
Well, we have finally come to the disassembly point in our build. Kind of an oxymoron really but were getting everything ready for powder coating. AQUALU HIGHLY RECOMMENDS YOU PRE-FIT ALL YOUR COMPONENTS PRIOR TO PAINTING OR POWDER COATING. We have received a lot of questions throughout the years in regards to painting or powder coating one of our tubs, so I will fill you in on what our customers have done in the past. Powder coating is the easiest, once you have pre-fit everything and are ready for some color, Block out and prep your tub and send them off to the powder coaters. With this method, there will most likely be some minor imperfections visible through the powder coat. For a more show room finish, some of our customers told us that they have used the powder coat as a primer base then sanded and prepped for a top coat finish. If you want to go straight to a body shop to have them lay down some automotive paint, we recommend starting with a coat of etching primer, then your high build primer before moving onto laying down some paint. Or you can simply Sand and polish our tubs for a mirror finish. Whichever method you chose to go with when it comes to putting some color on one of our tubs, one thing will always remain the same; a paint job is only as good as the prep work. For our frame, we sent it off to have it sandblasted. 2 days later it was ready for us to go pick it up. 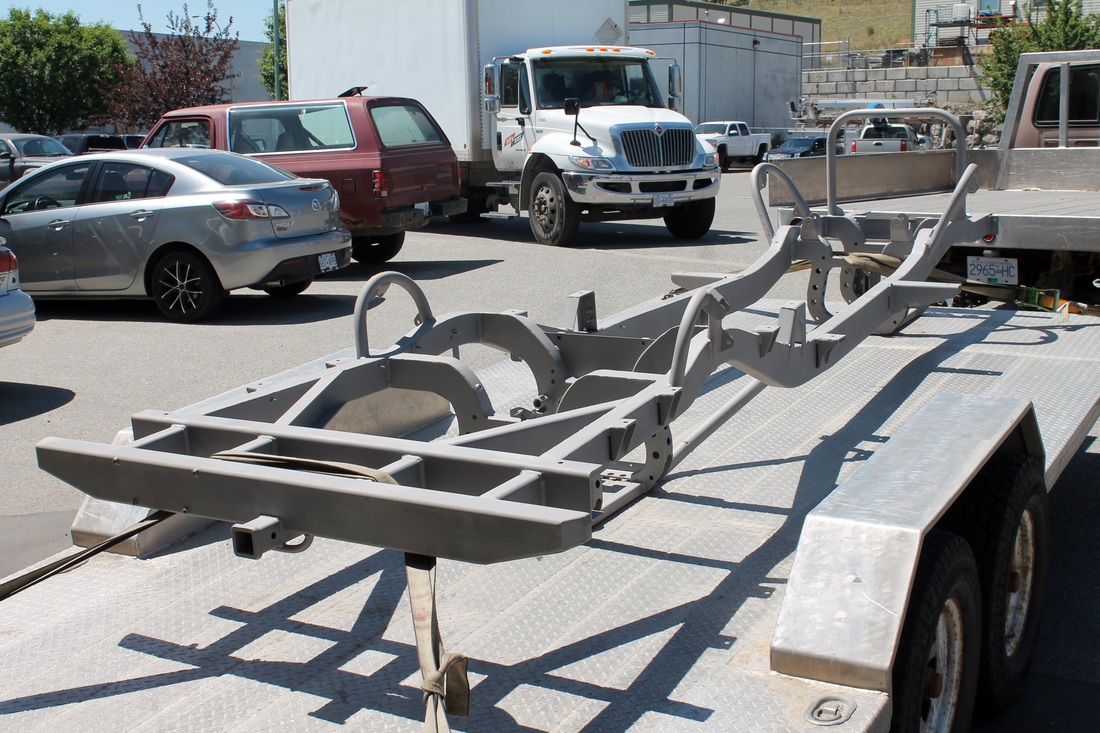 Before sending it to get powder coated we had a few last minute items that needed addressing and of course more prep work. 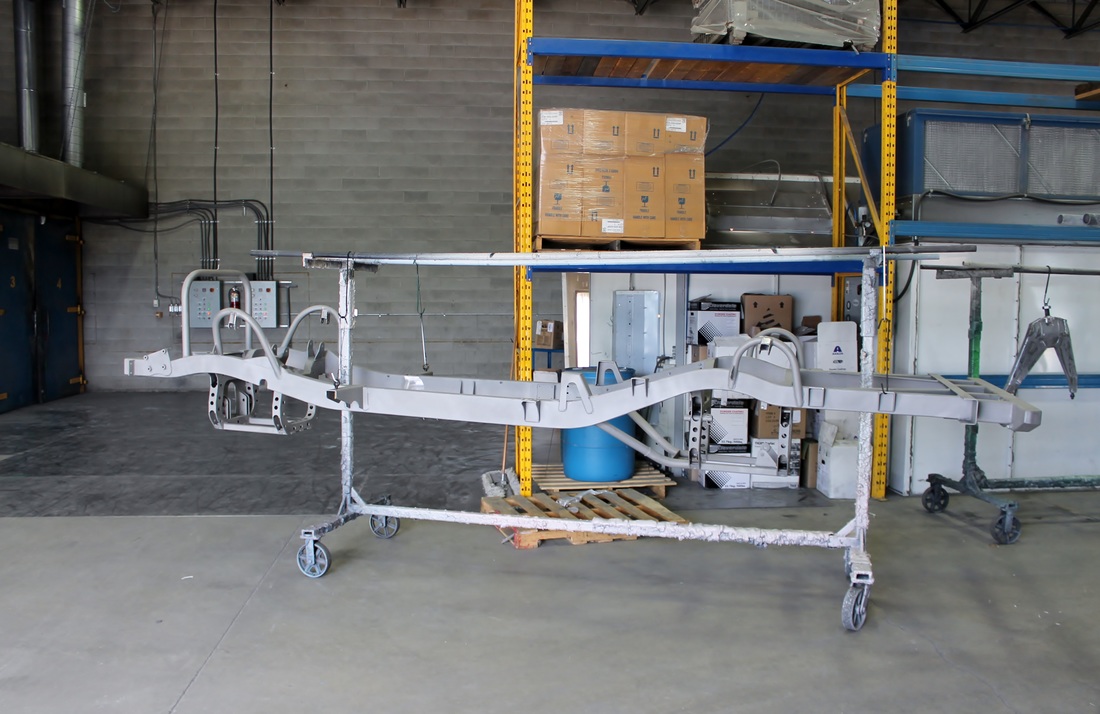 Jason Fritz at Protek Powder Coating helped us out again when our frame was ready for some color. We chose to go with a textured black for our chassis and as our accent color for most of our accessories on the truck. Nothing too flashy but it provides a great contrast against the color we chose for our truck. It wasn’t long before we had our Frame back from Jason and we could start piecing it all together again for the last time. 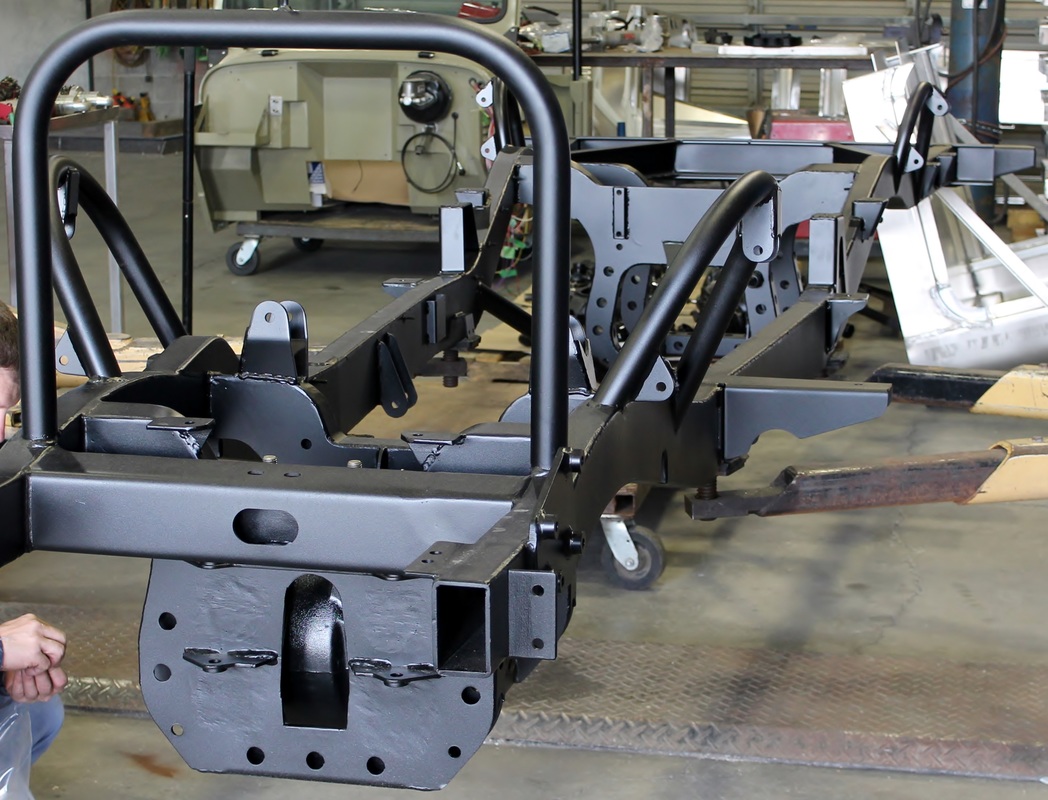 *Disclaimer, Aqualu only builds vehicles for in house abuse, we do not offer build services.*
Since the cab and cowl are in place we can now focus on fitting the rest of our body parts starting with the box. We are using a box we make in house, it’s our #4501 1965-1978 FJ45 long box & tailgate. Of course we added our own custom touches to the box like duel fuel tanks, wider inner wheel wells for clearance of our shock hoops and an access panel to service the rear steer if needed in the future. Looks like we may need to rethink our wheel choice if we want to keep this truck street legal! 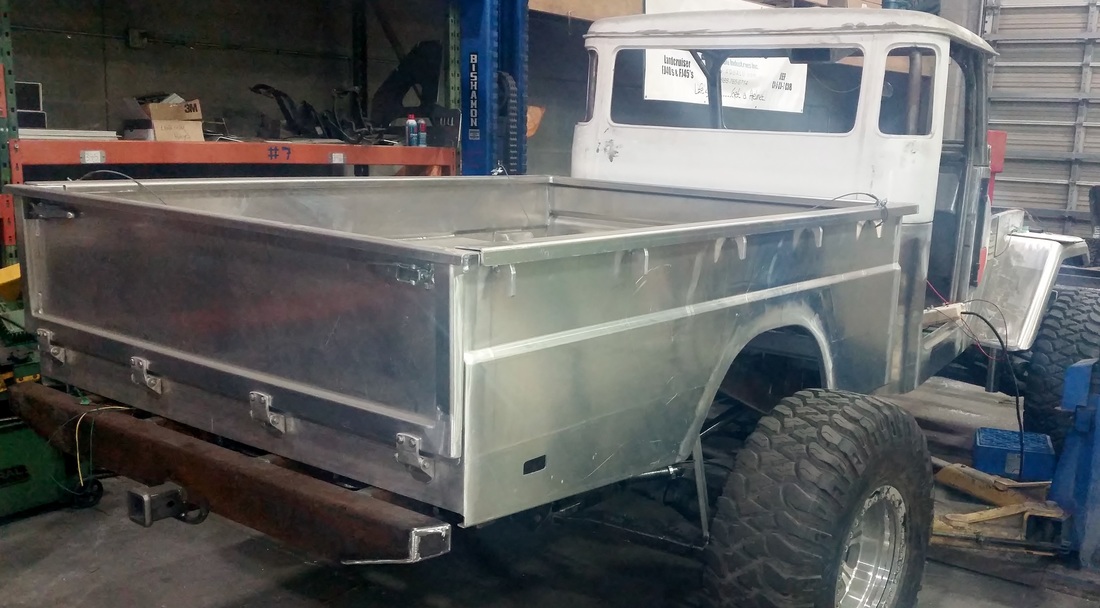 Next to go on was our #4050 FJ45 Hard Top, another product that we make in house. In fact we make a fiberglass hard top for our 6” stretched FJ45 cab as well. The roll cage was also added into our cab. And as you can see we are going to be taking a set of our #4038 rear fender flares - large and making them into a custom set of rear wheel flares in an attempt to get more wheel coverage. 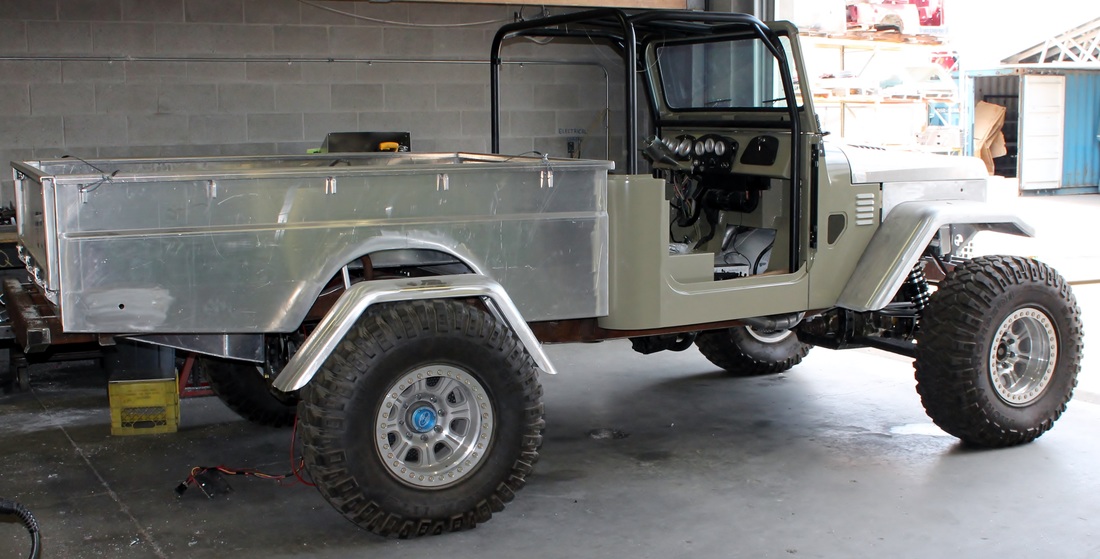 Moving to the front clip, we make all the components you see here in house from the hood to the front bib which includes cut-outs for factory style headlights and mounting holes for the headlight bezel. We started with our #4023 front fenders – extra wide but looks like we are running into the same issue as on the rear, custom front fenders and different wheels should remedy this issue. This thing is actually starting to look like a truck, a truck with over 27” of clearance to the rocker panels. 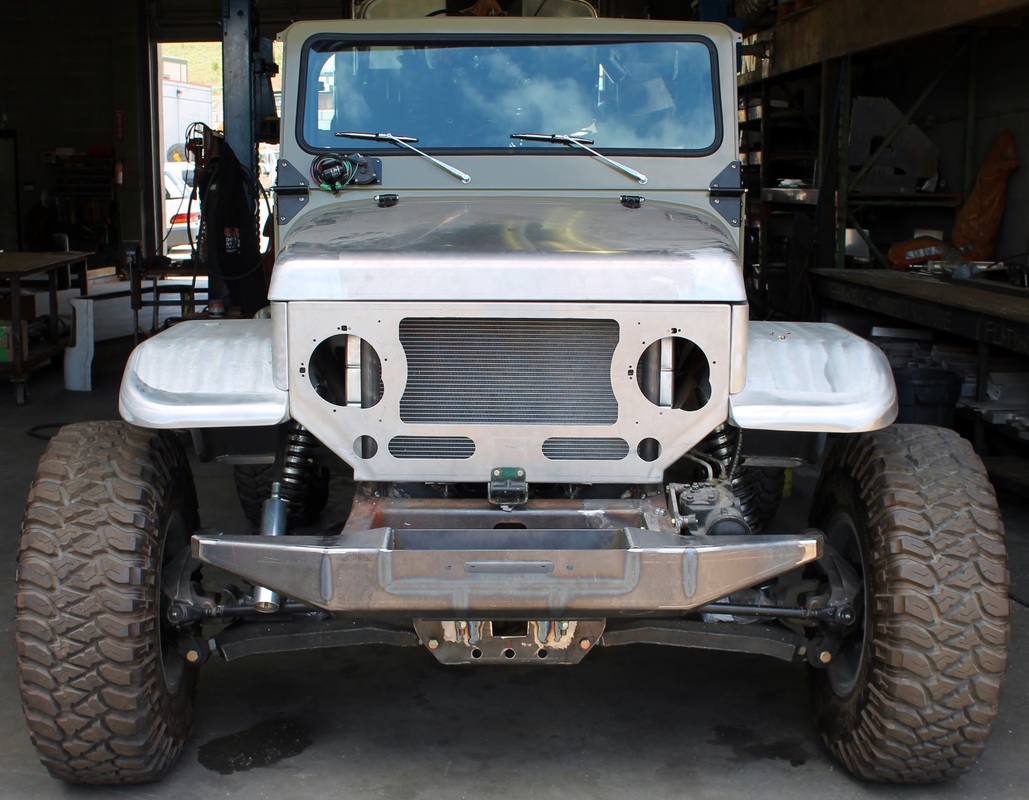 *Disclaimer, Aqualu only builds vehicles for in house abuse, we do not offer build services.*
|
AuthorArchives
January 2017
Categories |
 RSS Feed
Serving the Off-Road Community since 1989.
Get Updates from Aqualu |
Aqualu Industries Inc.
|
Aqualu Industries Inc. | Content Copyright © 2023